常见问题
Module FAQs - MN820
The MN820 System on Module (SoM) connects to external components such as the Host and LCD display via a high speed board to board connector. It contains the BT820B Embedded Video Engine as well as a 1Gbit DDR3 RAM. The dual row, 0.4mm pitch, 100 pin connector supports data transmission speeds up to 20GBps and contains the power, ground and display control pins for the MN820 along with the following interfaces:
- Dual Channel LVDS Tx
- Dual Channel LVDS Rx
- SD Card
- SPI Master
- SPI Slave
- I2S
- I2C (for touch controller)
- Stereo audio PWM output (sigma-delta modulated)
In addition to evaluating the BT820B when connected to the VM820C, the MN820 is ideal for integrating into end-products. Placing a 100-pin connector on the product PCB allows the MN820 to be easily attached, simplifying the hardware design of the product.
Yes, the MN820 System on Module (SoM) includes a 1 GBit of on-board DDR3L (Double Data Rate 3 Low Voltage) memory. This DDR3L memory is clocked at 667MHz, capable of running at speeds of up to 133MT/s (million transfers/second) with a data width of 16bits. The MN820 includes a DC-DC buck convertor that independently supplies the 1.35V core voltage for the DDR3L memory, with careful attention dedicated to ensuring proper functionality and signal integrity in the PCB layout for the memory module.
The MN820 is a standalone System on Module (SoM) featuring the latest 5th generation EVE IC, the BT820B, and on-board 1Gbit DDR3L memory. It is designed to allow users to integrate the BT820B into products via the 100-pin board to board connector, reducing development time and associated DDR3L design complexity whilst streamlining product development.
The VM820C is a baseboard module designed to be used in conjunction with the MN820, including power circuitry, I/O connectors, audio circuitry and a USB- to QSPI bridging IC enabling smooth communication with external devices. The MN820 is included with the VM820C.
In summary, the VM820C acts as a technology demonstrator and development board, supporting developers to access the capabilities of the BT820B. The MN820 is a ready-to-integrate BT820B module which developers can use on the VM820C initially and then develop into their end-product.
EVE FAQs - BT820B
The watchdog timer is one of the new features on the BT820B. It helps improve the reliability and robustness of the application by resetting the BT820B if an issue prevents the coprocessor from operating normally.
The watchdog timer continually counts down towards 0 from starting value. During normal operation, the coprocessor will periodically set the counter back to the starting value. If an error occurs which prevents the coprocessor from doing this, the counter will reach 0 and the BT820B will be reset, restoring it to a known state.
If a watchdog timeout occurs:
- The interrupt INT_CMDFLAG is set in REG_INT_FLAGS. An interrupt can also be generated.
- The host MCU can then read the string from the RAM_REPORT area of memory to determine the cause of the interrupt.
- The RAM_REPORT will contain the value “watchdog timeout” in this case
The MCU should do the following to recover:
- Set REG_CMD_READ to zero
- Wait for REG_CMD_WRITE to be zero
- The command FIFO is now empty and the coprocessor is ready to accept commands
Note that to use the watchdog, it must be enabled via a bit in REG_BOOT_CFG which can only be written using the SETBOOTCONFIG host command.
Our new BT820B has a frame buffer in external DDR3 SDRAM. The frame buffer is an area of RAM which contains the full bitmap of the screen. Like our other EVE family devices, the BT820B still generates display content based on a Display List, created using commands and instructions from the host MCU via SPI/QSPI. This object-oriented approach allows you to create comprehensive user interfaces quickly and easily, with minimal workload on the host MCU.
By rendering the content to a frame buffer instead of directly to the screen line-by-line, more complex graphics can be generated. Combined with the 16Kbyte Display List (now twice the size of earlier EVE devices), this makes the BT820B ideal for creating more complex and feature-rich user interfaces on larger and higher-resolution displays (up to 1920 x 1200).
For example, the frame buffer enhances rendering performance in applications with numerous scrolling charts and readouts such as medical bedside patient monitors. In our Utah Teapot demo, it allows the BT820B to render thousands of lines to produce a smoothly rotating wireframe shape. For applications using live video (via the BT820B’s video input) the frame buffer architecture enables real time video to be incorporated into user interfaces without sacrificing performance.
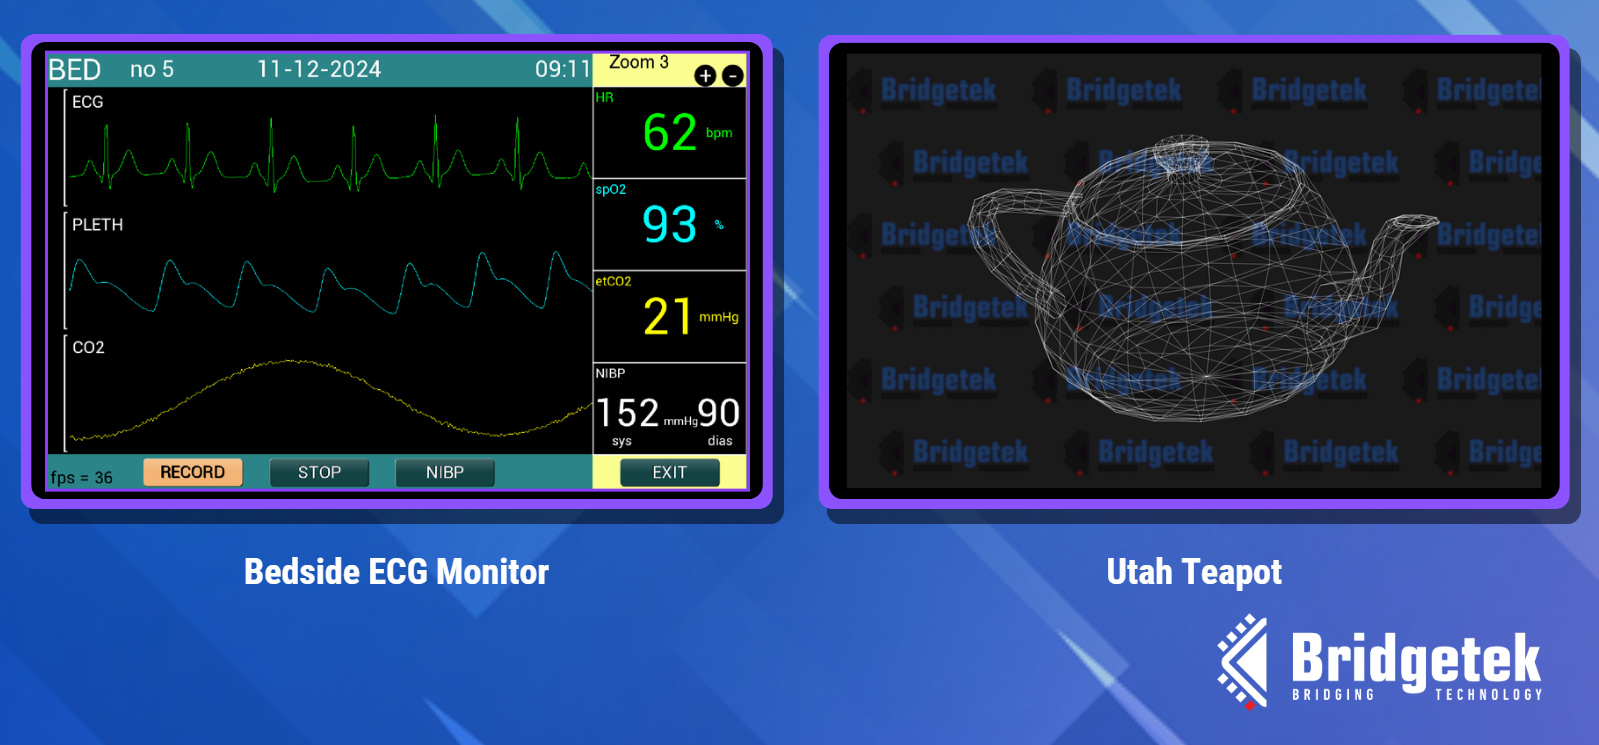
The frame buffer enhances performance for applications such as the bedside monitor and Utah Teapot
One of the main features available on the BT820B is the LVDS video input allowing users to integrate video streams of up to 1920 x 1200 at 60fps on to their displays. An internal real-time video image processing engine on the BT820B can be leveraged by users to apply effects onto incoming video streams via simple command driven operations. MCU resources can be saved by allowing the BT820B to enhance incoming video streams via its video processing capabilities, such as fish-eye effect reduction and gaussian blurs.
Image processing capabilities of the BT820B include:
- 调整大小: 轻松从输入的视频流生成缩略图。
- 模糊处理: Create more appealing user interfaces by blurring the background while keeping the foreground sharp.
- Rotating: Rotate the video easily and apply to shapes (such as cubes) for impressive visual effects.
- 灰度转换: 将图像转换为黑白。
- 特殊效果: 包括: 变暗处理:, 亮度增强:, 反相处理:, 阈值处理:, 对比度增强:, 对比度降低:, 曝光过度处理, 色调分离, Pseudo-HDR, 高级伪 HDR, and 组合 HDR.
- 直方图生成 计算并显示图像直方图用于图像分析。 利用 直方图 来 评估图像的亮度分布,有助于 增强图像处理和优化
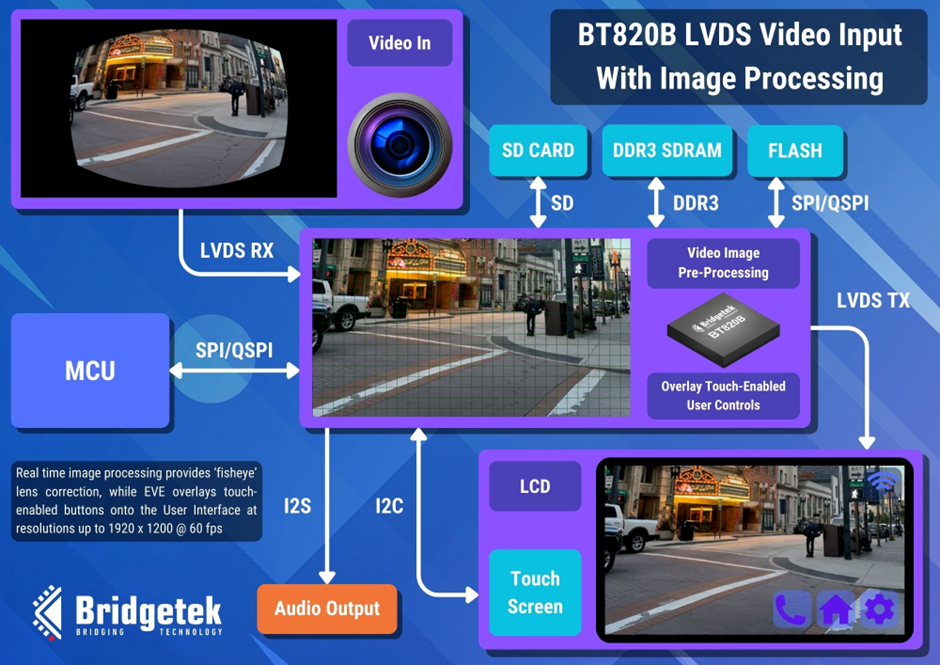
The BT820B’s real-time image processing capabilities include the correction of fisheye lens effect
EVE 常见问题解答 - BT88x
The EVE Asset Builder can be used to convert your chosen font into large characters. You can convert only the numerical characters to save space. Here is one way to do it.
Prepare the font character set:
- Obtain the font file (.ttf or .otf) for the desired font.
- Open the Windows Character Map and select the desired font (the font must be installed in Windows).
- Select the characters to be converted.
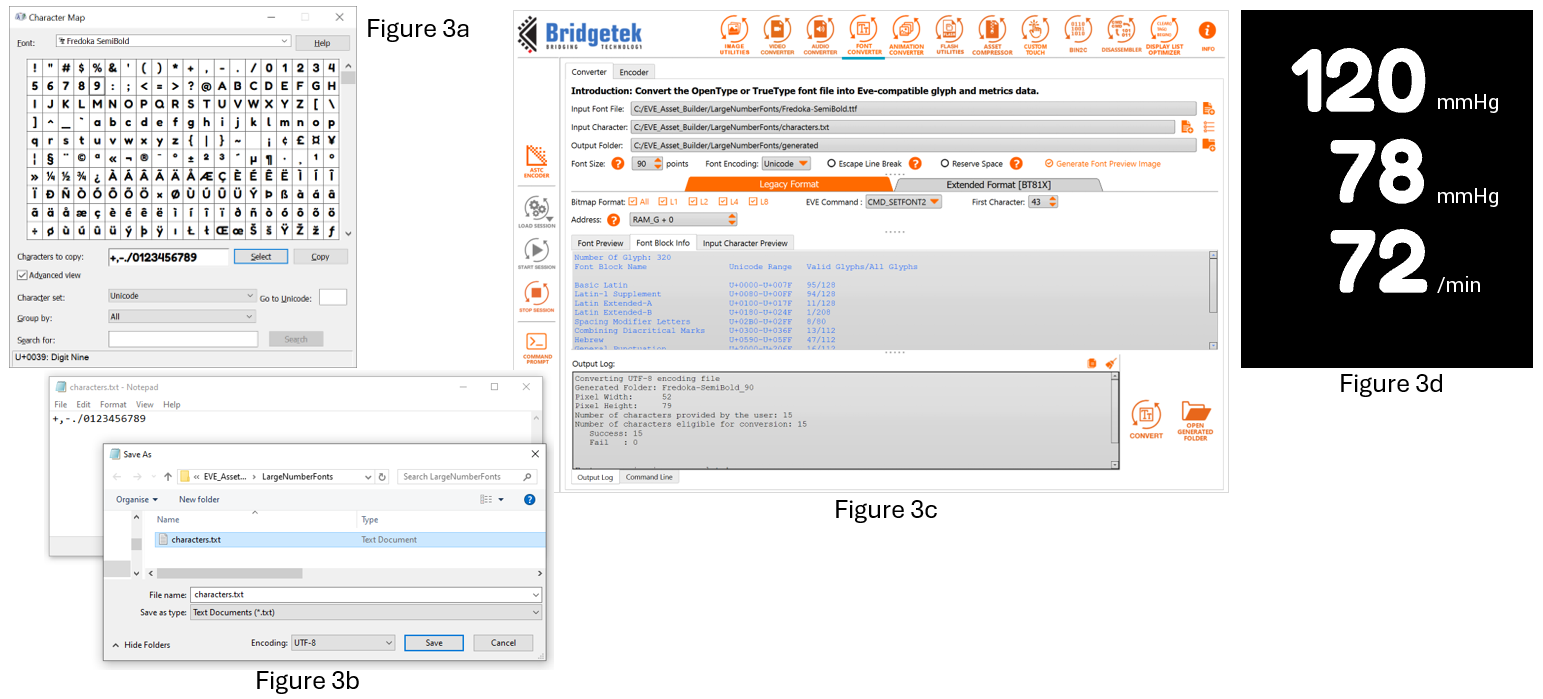
- Copy the characters, paste into Notepad, and save the file as UTF-8. (Figure 3b)
Note: We have chosen characters which are continuous in the ANSI character set so that the converted font can be used directly with EVE’s CMD_TEXT and CMD_NUMBER.
Convert the font:
- Open EVE Asset Builder and go to the Font Converter tab (Figure 3c).
- For Input Font, select your .ttf or .otf file.
- For Input Character, select your UTF-8 character text file.
- Here we selected the size as 90, and set the EVE command to CMD_SETFONT2.
- We set ‘First Character’ to 43 to match the first character ‘+’ in our chosen character set.
- Click Convert and once complete, go to the output folder.
- In this example we selected L1, L2, L4 and L8 formats which are converted into output folders of the same name.
- Copy the .raw or the .rawh file (which is a text readable version of the .raw file) for your chosen format into your MCU project as a data array.
Note: L8 offers 8 bits of colour depth but larger data size, whilst L1 offers 1 bit colour depth and smaller data size. In this case, we chose the L2 data which offers 2-bits per pixel.
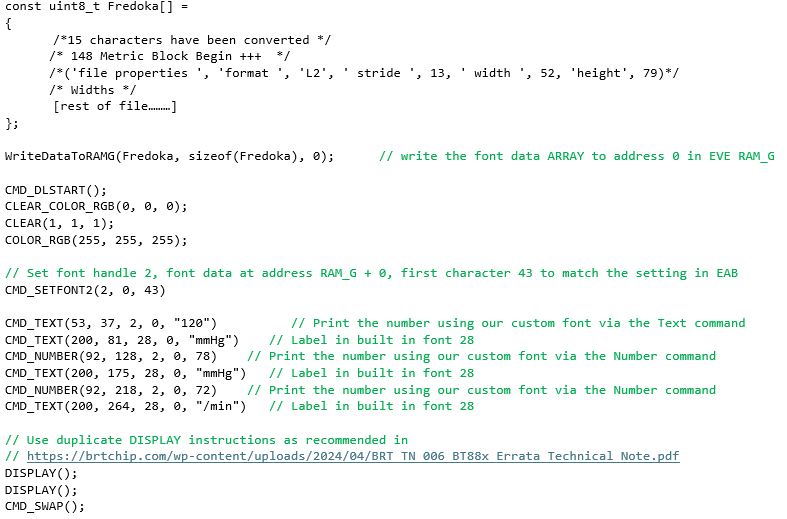
The final display is shown in Figure 3d. The code to set up and use your new font is very simple, as shown below Figure 3.
You can save even more MCU Flash space by compressing the font data. Stay tuned, we’ll show you how to do this in a future FAQ. You can however contact us at support.emea@brtchip.com for any further information on using custom fonts in your application with EVE…”
Here is the full list of commands for the example shown in Figure 3d.
Contact us at support.emea@brtchip.com if you would like an EVE Screen Editor (ESE) project which demonstrates this technique.
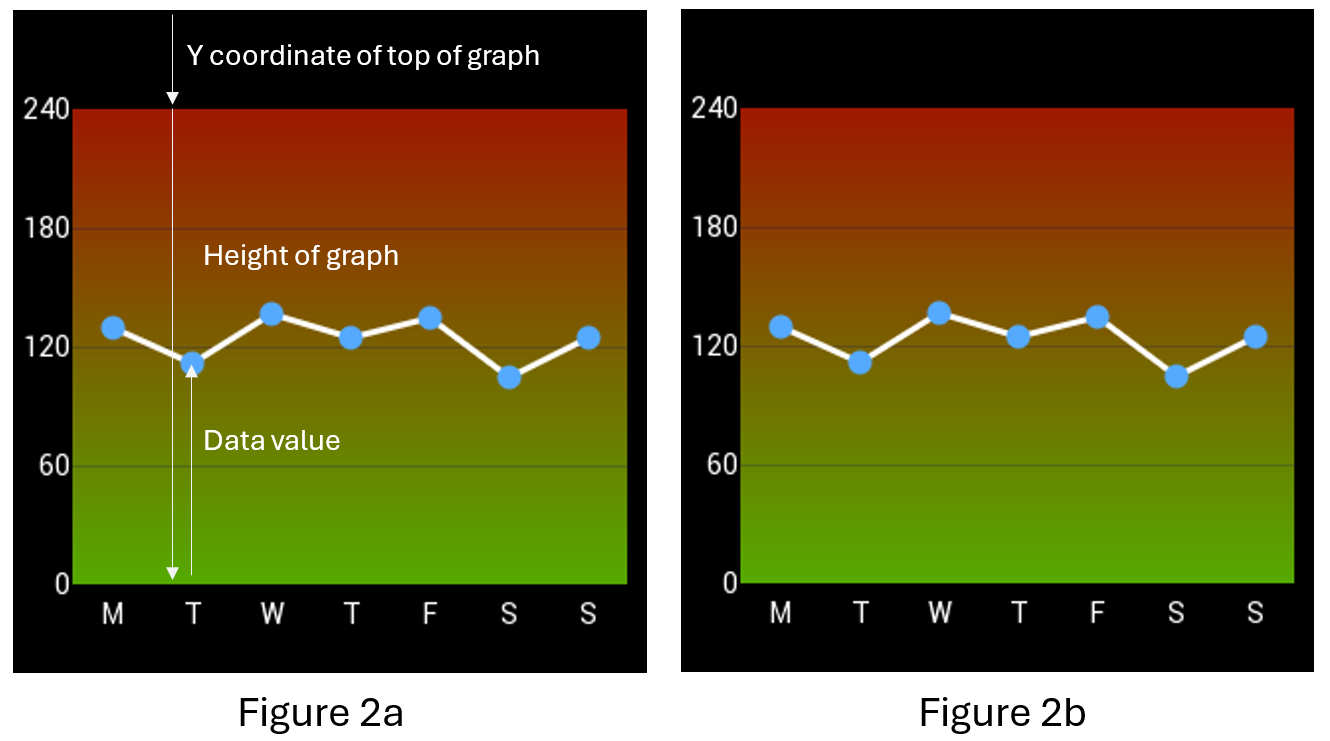
With EVE, you can design and customise your graph easily using the built-in graphics features. Here is one way to do it using the line strip feature.
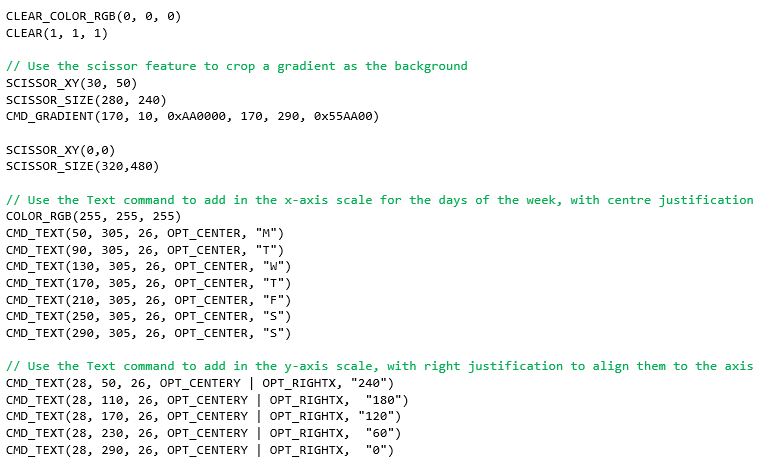
First of all, we draw the background using a gradient.
- The scissor functions allow the size to be set easily by limiting the gradient to a certain area of the screen.
- In this case, setting the chart height to 240 pixels matches nicely with the scale of the Y axis.
- You can find the list of commands used to draw the graph below Figure 2.
We can then draw the axes:
- Use the Text command to add labels for the X and Y axes.
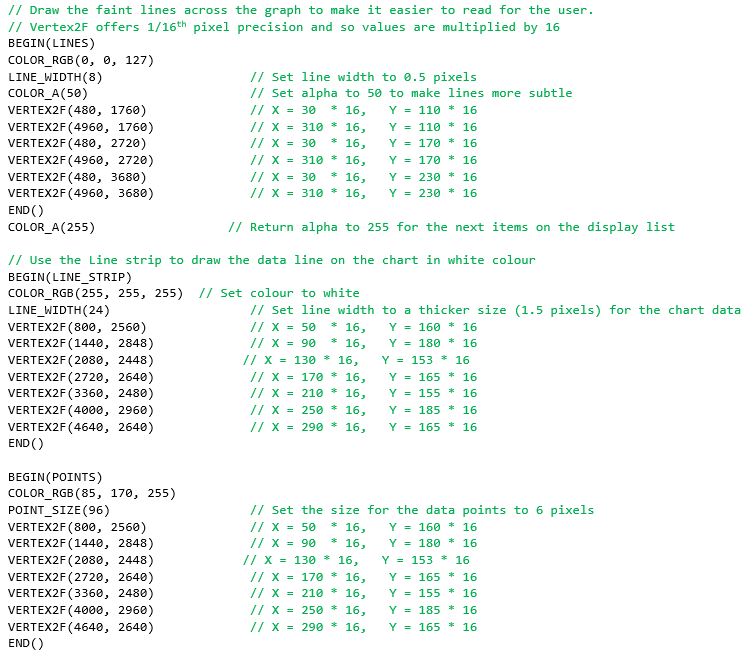
- We can also use the line feature to draw lines across corresponding to the Y axis labels.
We can now plot the data
- The Line Strip is an ideal solution as EVE will join the vertex points with a line.
- We have a vertex for each data point.
- The EVE Points feature can be used to place a point on each data value using the same coordinates as for the line strip.
For this graph, the X values match the seven days labelled on the X axis. The Y coordinates for each point can be adjusted to reflect the data values.
Using Tuesday’s data point as an example, the Y value for the vertex command can be calculated as shown in Figure 2a
Note that EVE coordinates begin at (0,0) at the top-left of the screen and that we multiply by 16 as VERTEX2F coordinates have 1/16th pixel resolution.
Y coordinate = ( [Y coordinate of the top of the graph] + [Height of graph] – [Data Value] ) *16
= (50 + 240 – 110) * 16
= 180 * 16
The vertex instruction for the position on the screen is therefore VERTEX2F(90*16, 180*16)
The final graph is shown in Figure 2b
Here is the full list of commands used to draw the graph.
Why not try it out now using our EVE Screen Editor (ESE) tool?
Just download and install ESE using the link above, set the Device Type to BT880, BT881, BT882 or BT883 in the Project window, and paste the code below into the Coprocessor window at the bottom of ESE.

Creating a bitmap may seem like the only solution but EVE’s gradient command can help instead. You can save MCU Flash memory space, BT88X-series RAM graphics memory space and indeed the time needed to create and convert a bitmap by using EVE’s built-in gradient widget.
The EVE gradient command renders a smooth gradient from one specified colour to another. However, for some applications we may want to have more control over the colour in certain parts of the gauge and so here we use two gradients. The first gradient for the upper half of the gauge goes from red to amber.
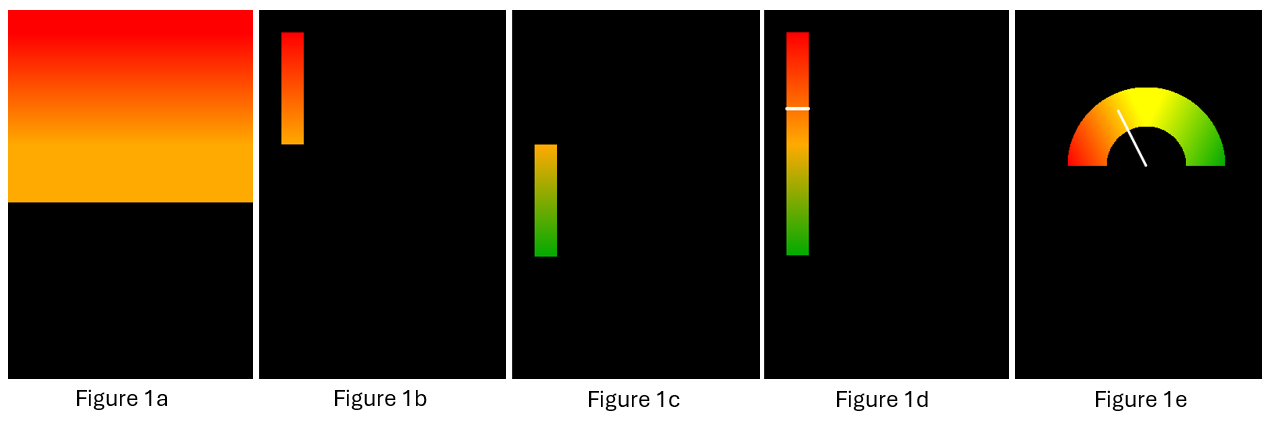
By default, the gradient itself fills the entire width of the screen between the start and end coordinates, and also extends below and above the specified coordinates, as shown in Figure 1a. We can use the Scissor feature to limit the gradient to a specified area: we set the top-left corner at (20,20) with Scissor_XY and then set the size in pixels (20 x 120) with Scissor_Size. Drawing the gradient now fills only the desired area as shown in Figure 1b. The full list of commands used to create the gauge are also shown below Figure 1.
We can then draw the lower half of the gauge using the same technique. This time, we use the same amber colour at the top of the gradient, and fade to green at the bottom as shown in Figure 1c.
We finish by setting the Scissor_XY back to 0,0 and the Scissor_Size back to the full screen so that any objects drawn after the gauge are not cropped. A save context and restore context can be used instead as shown commented out.
Various methods can be used to add a pointer. In this case a simple white line is used. The Y value of the vertex instructions can be adjusted to make the pointer move up and down along the gradient. Figure 1d shows the final gauge.
EVE Screen Designer has a range of built-in custom gauges that you can add to projects.
You can draw other types of gauges too using this technique such as the arc gauge shown in Figure 1e. Stay tuned, we’ll show you how to do this in a future FAQ. You can, however, contact us at support.emea@brtchip.com for any further information on drawing gauges with EVE…”
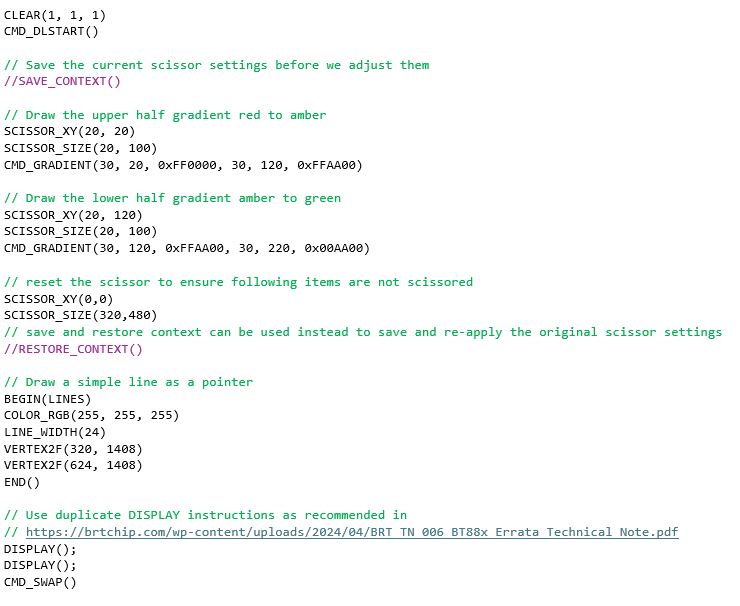
Here is the full list of commands used to draw the gauge.
Why not try it out now using our EVE Screen Editor (ESE) tool?
Just download and install ESE using the link above, set the Device Type to BT880, BT881, BT882 or BT883 in the Project window, and paste the code below into the Coprocessor window at the bottom of ESE.
Yes, the BT88x is ideal for using with circular displays. These are available in various sizes such as 2.1” diameter and are great for making digital gauges. The BT88x series includes resistive (BT880 and BT882) and capacitive (BT881 and BT883) touch versions, so you can choose a screen with the best type of touch for your application (or you can use without touch if it is not required). Some panels require the display itself to be set to RGB mode after power-up via a separate serial channel. It is recommended to check the datasheet for your display as if this is needed, some additional pins on the display connector should be connected to your host MCU. Find out more about the BT88x series ICs in the BT88x Datasheet.
The VM880C connects to a host MCU via a 10-way pin header which has power and SPI signals. Since the EVE devices act as an SPI peripheral, you can use any MCU which has an SPI Master. For an existing design, you can connect the module to a spare SPI master on your existing MCU. For new product designs, you can choose the MCU based on the key product requirements (for example, one which has PWM outputs if you will be controlling motors, or one which is low-cost and has a small PCB footprint). The VM880C can also connect to a PC via a USB-SPI cable. See the VM880C datasheet 了解更多详细信息。
一些MCU的关键要求是:
- 可设置为SPI模式0的可用SPI主控
- 使用的SPI信号包括SCK、MOSI、MISO、CS#(注意CS#可以是GPIO)
- 用于电源关闭信号的可选GPIO输出
- 可选的中断输入(如果需要中断操作)
- 由于VM880C板载缓冲器,SPI和GPIO可以使用5V或3.3V信号电平
这两个模块都可以让您轻松评估BT88x系列。在选择这些模块之间的主要因素是您将使用哪种类型的MCU主机。
IDM2040-43A具有一个板载的RP2040微控制器,可以用C和CircuitPython等语言进行编程。集成的MCU使得这个模块自包含,只需通过USB连接到计算机进行编程。连接器允许访问RP2040的各种I/O,例如I2C和GPIO,以连接外围设备。
- IDM2040-43A只能与板载的RP2040作为BT88x的主机一起使用,不能与其他MCU一起使用。
- Capacitive touch screen (4.3” LCD integrated into the module)
- 塑料镶边,便于安装
- 使用BT883 EVE图形控制器
- 查看 IDM2040-43A datasheet 了解更多详细信息。
VM880C是专为连接您自己的MCU和显示器而设计的。
- VM880C模块可以与任何具有SPI主控的MCU/主机一起使用。
- 例如4.3英寸或5英寸的电阻式触摸屏(不包括LCD)
- 信用卡尺寸的PCB板,带有40针FPC用于显示和10针排针用于SPI
- 使用BT880 EVE图形控制器
- 查看 VM880C datasheet 了解更多详细信息。
EVE 常见问题 - 常规
我们的BT81x系列(BT815、BT816、BT817、BT818)具有Quad-SPI NOR Flash接口。您可以将图像存储在NOR Flash芯片上,然后EVE可以直接访问它们。
BT81x还可以使用ASTC格式,该格式可以减小图像大小同时保持良好的图像质量。EVE连接的Flash还可以存储字体、视频和动画等资源,确保即使主机MCU的Flash大小较小,也可以使用所有这些资源。
您可以使用 EVE Asset Builder 使用(EAB)转换您自己的自定义字体,这样您就可以使用大号数字和字母,并选择字体样式。
EVE has a range of built-in font styles and sizes but some applications may require extra-large fonts. Convert selected characters from your preferred font using EAB to give your elevator panel your desired style and ensure ease of viewing with extra large characters.
使用EVE,您可以轻松地通过彩色触摸屏改善您的用户界面。 无需 不需要升级到更高规格的MCU。
通过连接到现有MCU上的可用SPI主控,EVE易于添加,同时最大限度地减少硬件重新设计。EVE还易于通过其简单的命令集集成到您的软件中。EVE可减轻大部分MCU的工作量,使您能够创建一个用户友好且吸引人的用户界面,而无需高性能MCU。由于EVE内置了触摸控制器引擎,触摸控制也可以通过最小的硬件和MCU开销实现。
您还可以使用EVE图形功能创建自己的控件,例如弧度表和图表,以赋予您的设计独特的外观。
EVE has a range of built-in widgets for common controls such as buttons, sliders and gauges. These make it easy to add controls to your application. However, you can also create your own controls using the EVE display list.
您甚至可以将内置小部件与自定义设计结合起来。例如,仪表小部件非常有用,因为它省去了手动绘制和旋转指针的需要。绘制不带背景和/或刻度的仪表,允许您在后面添加自己的图形,制作出具有吸引力的自定义仪表。
我们的网站上有自定义控件的示例,例如弧度计和图表 Bridgetek Github page,在我们的示例中 EVE Screen Editor 和 EVE Screen Designer.
EVE具有一系列功能,如音频音调输出、各种图像格式的图标,以及内置的小部件,如按钮/滑块,这些都可以帮助实现这一目标。
创建触摸用户界面时,使其更直观的一种方法是向用户提供反馈,以确认其触摸被接受。EVE拥有广泛的内置音频音调可供选择,并且可以通过简单的寄存器写入来触发,这是显示触摸被检测到的理想方式。
Some EVE widgets (such as the button widget) have a 3D effect which gives an unpressed appearance. You can turn off the 3D setting to make the button flat when a touch is detected on the button, causing the button to appear to be pressed in. Images are also often used as touch icons for custom styling.
EVE的图形功能使得添加效果变得容易,例如当按下时在图标周围添加彩色边框,改变图标的颜色,甚至施加效果,如轻微缩小图标以产生“按下”效果。
在实现屏幕上的控件(如光标和X/Y控件)时,另一种有用的技术是在光标后面绘制一个更大的不可见圆圈,并对其应用触摸标签,以便光标有效地具有更大的区域。
EVE具有创新的触摸标记和跟踪功能,使得解释屏幕上的触摸变得更加容易。
With tagging, you can assign tag numbers to objects on the screen when you draw them. When the screen is being displayed, you can check for touches by simply reading a register which will return the tag number if a tagged item is being touched (you can still read the X and Y coordinates of the touch too if required).
这对于屏幕上的按钮等控件非常理想。您还可以启用中断以通知MCU如果标记值发生变化。
这些器件之间的主要区别在于,BT882/3 包含一个色深更高的 RGB 接口(RGB666 对 RGB888),增加了一个 GPIO 引脚(3 GPIO 对 4 GPIO),封装尺寸比 BT880/1 有所增大(QFN48 对 QFN56)。
1.It allows you to use a low-cost MCU for applications with graphical display, touch and audio.
-
- 是现有产品和新产品升级的理想选择。
- 创建美观、功能强大的人机界面,同时减少 MCU 的负载。
- 外部闪存可卸载 MCU 内存(BT81x)的存储。
- 使用您喜欢的 MCU - SPI 命令集可与几乎所有 MCU 配合使用。
2. 单独的图形控制器提供了灵活性。
-
- 有更多的 MCU 可供选择 - 代码可以轻松移植到不同的 MCU 上。
- 更换完全不同的 MCU,添加 EVE SPI 例程,重新使用相同的 EVE 应用程序代码,可节省大量成本、时间和精力。
3. Bridgetek’s powerful graphical toolchains and code examples make application development easy.
-
- EVE 屏幕设计师 可在 PC 上开发图形用户界面并生成代码。
- EVE 屏幕编辑器允许用户通过拖放以图形方式开发屏幕内容。
- 全面的软件示例让代码开发变得简单。
4. 受益于面向对象的操作。
-
- 编程简单直观。
- 使用标记和跟踪功能轻松添加触摸功能,同时最大限度地减少 MCU 的负载。
EVE stands for Embedded Video Engine, which is powered by FTDI Chip in-house technology developed for embedded graphics and video applications. It will greatly reduce the development effort as well as the MCU bandwidth required for graphic displays. EVE has 3-in-1 functionality including display, audio, and touch, and in combination with its object oriented methodology makes the creation and rendering of graphics very easy/intuitive while at the same time greatly reducing the system implementation costs.
与 GPU 相比,EVE 有许多与众不同之处,包括
无外框缓冲集成触摸屏
用于控制和执行显示的简单串行 MCU 接口,即 SPI、Quad SPI(仅限 FT81X)和 I²C
通过内置声音合成器进行音频播放 LED 背光 PWM 输出
总的来说,它是一种先进的架构,提供完整的图形用户界面功能,能够创建高级图形,同时易于开发。
主要功能包括
- Built-in graphics operations allow users with little expertise to create high-quality displays Widget support can offload the system MCU and provide a variety of advanced graphic capabilities and efficiencies
- Integrated with a 4-wire touch-screen controller and CTPM through an I²C interface for providing a complete GUI experience Serial interfaces to host MCU with QSPI (FT81X only), SPI or I2C for lower pin count and system cost Programmable interrupt controller provides maximum flexibility with host MCU
- 精度在 +/- 5.6% 范围内的内部 12MHz 振荡器;集成时钟乘法器和系统时钟输出功能(48 或 36MHz)
- 时钟切换命令,用于切换内部或外部振荡器与 12MHz 晶体,或外部 12MHz 时钟输入,以满足更好的时钟要求
- 液晶显示屏支持 SVGA (800×600)(仅限 FT81X)、WQVGA (480×272) 和 QVGA (320×240),支持数据启用模式和 VSYNC/HSYNC 模式
- 通过 PWM 输出进行音频通道输出 声音合成器
- 低功耗
- 灵活的电源模式控制,包括掉电、睡眠和待机状态 支持 1.62V 至 3.63V 的主机接口输入/输出电压
- 支持更宽的温度范围(-40 至 85 摄氏度),可满足广泛的市场应用需求
- 低内部电压调节器为数字内核提供 1.2V 电压,实现低功耗运行
FT8XX 功能具有最高价值,可满足最广泛的市场需求。该架构可扩展,易于分区,因此可以快速引入其他家族成员。此外,在公布 EVE 路线图之前,我们会不断评估市场反馈和战略机遇,并感谢用户的意见。
是的,我们的合作伙伴 MikroElektronika 提供了一种产品 Visual TFT,它支持 EVE 的许多功能、对象和小部件。Visual TFT 售价 90-99 美元,可帮助客户快速轻松地开发图形解决方案。由于该软件采用了许多高级图形元素,可随时使用和操作以创建外观专业的显示屏,因此它将大大缩短学习曲线(详情请访问 www.mikroe.com)。
The display list contains the commands that EVE interprets and processes to generate the display. Each display command typically occupies 4 bytes. The maximum size for a display list is 8KB of RAM.
Widgets are predefined graphic objects intended for a specific display/functionality, like items such as clocks, toggle switches, progress bars, etc. They are used to assist developers in creating the screen shot much easier. Widget styles can also be changed by specifying various parameters appropriate to the widget.
FT80X: 256K 字节
FT81X: 1M 字节
EVE 可以显示位图,并具有解压缩 JPEG 数据的功能(仅限基线配置文件)。
FT80X:通过软件解压缩 JPEG 数据。
FT81X:通过硬件解压缩 JPEG 数据。
不,EVE 没有 MP3 解码器功能。
FT80X- 没有,但 FT80X 具有渲染显示动画的功能。FT80X 编程指南》中提供了这些功能的详细信息和示例代码。
FT81X- 是,FT81X 支持播放运动-JPEG 编码的 AVI 视频。
As long as MCU has QSPI (FT81X only), SPI or I2C interface and has the capability to construct display list commands, it can work with EVE. This means that a low end 8 bit microcontroller can be readily used with EVE or because the bandwidth requirements are minimal that the current MCU can be used and the display capability readily added into the architecture/system.
实际上,只要 MCU 有足够的内存来构建一个 4 字节的显示命令,并通过芯片接口将其传输给 EVE,EVE 就能显示图形。
EVE 系列使用随设备提供的内部部件。要制作额外的复合对象,需要在控制器固件中加入一个函数,以构建显示列表并发送给 FT8XX。这与使用 4 字节部件不同。
有两个显示列表缓冲区,一个用于编辑以创建新的显示,另一个则包含当前正在执行的显示列表。控制器代码中需要一个交换命令,以便在可编辑缓冲区和执行缓冲区之间交换。
目前没有。这些工具是将标准文件格式转换为与 EVE 兼容的其他标准文件格式的免费范例。因此,用户可以在 Linux 和 MAC 上使用其他工具。
Yes. They will be treated as separate objects. The only limitation is that the files must be small enough to fit in the memory (FT80X: 256kBytes, FT81X: 1MBytes)
不, 输出依赖于 MikroE 库,可为应用程序开发提供集成的单源解决方案。
EVE 系列显示控制器可输出 RGB 信号,用于连接 RGB 显示面板。不过,您也可以添加一个外部 RGB 转 LVDS IC,将这些信号转换为 LVDS(低压差分信号)。我们的 ME817EV 板上就有一个例子,它包含一个 FIN3385 平板显示器链路串行器/解串器,可支持 RGB 或 LVDS 显示器。有关该评估板的详细信息,请点击此处: https://brtchip.com/wp-content/uploads/sites/3/2022/01/DS_ME817EV.pdf
Yes, this is possible. The FT812/3 and the BT81x series have 24-bit outputs on their RGB interface (8 red, 8 green and 8 blue). However, they can be used with LCD panels which have a smaller color depth. Many displays have 18-bit RGB interfaces (6 lines per color). When using a display with fewer bits per color, the REG_OUTBITS register can be written to set the number of lines per color. See the EVE Programmers Guide for details of this register. When setting a number of bits which is less than the maximum for your EVE family device (for example, setting a BT817 to 6 bits per color instead of 8) note that the output is justified to the upper bits. Therefore, your display’s R5:0, G5:0 and B5:0 would be connected to EVE output pins R7:2, G7:2 and B7:2 respectively. The output lines R1, R0, G1, G0, B1, B0 on EVE would not be used.
EVE 常见问题 - 接口
EVE has an innovative tagging and tracking feature which makes implementing touch controls easy, including rotary controls. Touch tagging allows you to assign a tag to an object on the screen. You can easily determine which item is being touched by reading the REG_TOUCH_TAG register, either by polling or in response to an interrupt (EVE can generate an interrupt on a change of touch condition)
Tracking extends this feature further via CMD_TRACK. You can set an area on the screen and then determine the relative position of the users touch within that area by simply reading REG_TRACKER. Tracking can support linear and radial modes.
- The linear mode is ideal for sliders and scroll bars, and reports the distance along your defined tracked area from 0 to 65536
- The radial mode is ideal for rotary dials. The tracking value represents the angle of the touch point relative to the object’s centre in units of 1/65536 of a circle. 0 means that the angle is straight down, 0x4000 is left, 0x8000 is up, and 0xc000 is right.
Tagging and Tracking support multi-touch (up to 5 touches) on capacitive touch versions of EVE such as the BT817, with five Tag and 5 Tracker registers (e.g. REG_TRACKER to REG_TRACKER_4) providing the results.
Colour picker controls are often used for mood lighting as well as setting display themes. With EVE, it is easy to create various styles of colour picker based on an image.
EVE stores images in RAM_G for display on the screen. The MCU can read this image data from RAM_G via SPI reads. Since we know the size of the image and the format of the image data (e.g. RGB565 has 2 bytes per pixel with red/green/blue data formatted as RRRRRGGG GGGBBBBB) we can determine the colour of each pixel. By combining this with the position of the user’s touch relative to the image, we can determine the colour of the pixel within the bitmap image that they are touching. The image could be a colour gradient or any other custom image that suits the application.
Sliders can be added to provide further brightness and saturation adjustment of the selected colour. Ensure that the screen is calibrated for most accurate results. EVE’s built-in calibration features allow easy screen calibration.
We have examples of colour picker implementations in our EVE Screen Designer (see Examples > Basic > ColorPicker) and we have further explanations and examples of some colour picker techniques in Application Note BRT_AN_074.
EVE provides full PWM control over the external LCD backlight driver circuitry for a display. You can adjust the screen brightness as desired through simple register writes. This is ideal for applications where the screen brightness may be varied by the user via an on-screen slider, for example, or automatically (by connecting an ambient light sensor to the MCU).
The EVE series of display controller ICs include a BACKLIGHT pin which provides a PWM signal to the LCD backlight driver circuit. The PWM output from this pin is controlled by the REG_PWM_HZ and REG_PWM_DUTY registers. REG_PWM_HZ allows for a valid frequency range from 250Hz to 10000Hz, while REG_PWM_DUTY can be set between 0 and 128 (0 means backlight completely off, 128 means backlight at max brightness). Your application can therefore have full control of the LCD brightness.
You can also turn off the backlight and put EVE into a low power mode when the smart home controller is idle. EVE can pass the interrupt signal from the touch panel to your MCU, allowing you to wake EVE and illuminate the display when a user touches the screen.
EVE 包含一系列内置音效,如蜂鸣声、钟声、点击声和乐器声,可以通过简单的寄存器写入来播放。
这些功能省去了录制和微调声音的辛苦工作,甚至无需尝试使用MCU生成专业的声音音调。使用触摸标记来检测屏幕上的图标或按钮被触摸时。
然后,将您选择的声音的十六进制代码写入到REG_SOUND以播放它(请参阅EVE设备数据表中的音频部分以获取声音表)。
您还可以通过REG_VOL_SOUND来设置音量,这对于使警报声音更大声和触摸确认更加离散非常有用。
Yes, BT815/6 and BT817/8 have features to make animations easy. You can play multiple animations simultaneously. Convert your GIF file(s) using our EVE Asset Builder and then play them on EVE with just a few commands. Store your animation data on EVE’s directly attached NOR Flash to minimise Flash usage on your host MCU. BT817/8 has some new animation features, allowing you to play animations from RAM_G and CMD_RUNANIM which makes animations even simpler to play.
许多电容触摸面板(CTP)具有可调节的灵敏度。在这种情况下,您可以使用我们的自定义触摸功能通过写入CTP的寄存器来配置它。这将有助于确保您的触摸界面具有良好的用户体验。查阅您的CTP的数据表,了解它支持哪些设置。自定义触摸功能适用于BT881、BT883、FT811、FT813、BT815、BT817和BT817A。在我们的电容触摸指南中了解更多信息。 BRT_AN_090.
The newest generations of EVE ICs (FT81x, BT81x) support the implementation of custom touch controller firmware to support a wider variety of Capacitive touch controllers. Custom touch controller firmware can be compiled using our EVE Asset Builder (https://brtchip.com/eab/)工具链,其中还包括了如何在EVE的引导序列中加载这个固件的说明。请参阅BRT_AN_090 Eve使用电容触摸屏 (https://brtchip.com/wp-content/uploads/2025/02/BRT_AN_090_EVE_Working-with-Capacitive-Touch-Screen.pdf) 了解更多详情。
EVE按照显示列表中的顺序显示项目。因此,显示列表中较下方的项目将覆盖较上方的项目。因此,显示列表末尾显示的形状或图像可以覆盖先前屏幕内容。这对于在用户界面的顶部添加菜单或消息框非常有用。您还可以使用Alpha设置(COLOR_A)为消息框提供部分透明度,以获得更好的视觉效果。
某些图标可能具有特定的轮廓形状,或者可能在您希望显示背景的区域内有区域。您可以使用图像作为状态指示和触摸按钮的图标,使您的界面更加直观。确保您的原始图像采用支持透明度的格式。您可以使用 CMD_LOADIMAGE 将透明 PNG 图像加载到 EVE,也可以使用 EVE Asset Builder 转换它们(https://brtchip.com/eab/)。转换图像时,请确保转换为支持透明度 (alpha) 的格式,例如 ARGB1555 或 ASTC。
FT80X:连接主机 MCU 的标准串行接口包括 SPI 频率高达 30MHz 或 I²C 时钟频率高达 3.4MHz。
FT81X:连接主机 MCU 的标准串行接口包括 QSPI 频率高达 30MHz。
EVE can be designed into a system without the need to add an external crystal component. EVE has an internal oscillator that is enabled by default upon power on. The frequency of the internal oscillator is 12MHz ±5.6% across the operating temperature (-40° to 85°C).
使用外部晶体元件时,晶体元件的频率应为 12MHz。
这些连接器是 2×8 路 Micro-MaTch 连接器,可扩展 VM800P 的 IO,通过 ATMEGA328P 的 SPI 端口添加以太网、RS485、继电器等接口。
No. For designs requiring additional memory for storing objects such as images and audio files the additional memory must connect to the MCU. This allows for extra flexibility as the MCU can access the memory for other non-EVE associated files without going via the FT8XX and as such, the extra system memory becomes general purpose. This architecture also allows for the additional memory to be either USB, SD Card or other formats.
No. Current device in the series are designed for RGB only
可以。FT8XX 包含一个名为 swizzle 的功能,可以更改红、绿、蓝数据线的分配。用户既可以交换整个颜色引脚组,也可以颠倒位序。要进行交换,应用代码必须访问 REG_SWIZZLE 寄存器。
No, the raw touch screen information is acquired, processed and updated in the respective register for the MCU to read. EVE does the noise filtering for the resistive touch-screen. The x, y data is loaded into registers to be read by the MCU. In addition, a resistive location can be defined and mapped to a specific character (i.e. a specific alpha-numeric) so that this specific character is transferred from the FT8XX to the MCU, such that the MCU need not execute any parsing functions.
Essentially yes. The FT8XX at its most basic level can be considered as a QSPI (FT81X only) or SPI peripheral to a host controller. Whether that host is in the MCU or FPGA is up to the designer.
Although each instruction is sent over QSPI (FT81X only) or SPI interface, this cannot be guaranteed as not every instruction does the same thing. E.g. some instructions must fetch objects from object RAM while others draw primitives on the fly. Widget instructions are like zip files which must be extracted to create a full list of commands for the display list.
FT93x 和 FT90x 采用相同的 SD 主机控制器。我们测得的速度为(Class10、16KB Cluster、FAT32): FT930,SDCLK@25MHz USB 读取(100MB):9.7 MBytes/sec USB 写入(100MB):6.8 MBytes/sec FT930,SDCLK@50MHz,Class10 USB 读取(100MB):18.5 MBytes/sec USB 写入(100MB):8.0 MBytes/sec。
EVE 常见问题 - 能量
上电时,EVE 处于待机状态。从主机接口读取位置 0 的虚拟数据将使 EVE 从 "待机 "状态进入 "激活 "状态。
EVE 支持 4 种电源模式。
- Active state – EVE is in full function mode performing graphic rendering, touch processing and audio processing.
- Standby state – in this state, the crystal oscillator and PLL are functioning, and the system clock to EVE’s core is disabled. All register content is retained.
- Sleep state – in this state, the crystal oscillator and PLL are disabled, and the system clock applied to EVE’s core is disabled. All register content is retained.
- Power down state – in this state, the internal 1.2V regulator supplying the core digital logic is disabled. The crystal oscillator and PLL are disabled, and the system clock applied to EVE’s core is disabled. All register contents are lost and reset to default upon power on reset.
EVE 常见问题 - 显示
EVE has several features which can help you maximise battery life. Many In-Home Displays for Smart Meters (and smart meters themselves) use battery power for portability (or due to the lack of a power source nearby). A combination of reducing the current drawn by the display and audio, putting EVE into low power modes and putting the MCU into low power modes can help maximise battery life.
One way to save power, even during use, is to dim the display via the backlight Pulse Width Modulation output. Your MCU could use an ambient light sensor and dim the backlight when full brightness is not needed, or it could have a slider on the EVE display itself to adjust brightness.
When the In-Home Display is idle and the display can be blank, the following steps can help to reduce power:
- Turning off the backlight completely by setting the REG_PWM_DUTY register to 0
- Setting all RGB output pins to low. This can be achieved by putting EVE into Power Down mode. If putting EVE into Standby/Sleep modes, the host MCU can set the RGB pins (including HSYNC/VSYNC/PCLK/DE/R[8]G[8]B[8]) to low by setting REG_HSYNC1=REG_HSYNC0 and REG_VSYNC1=REG_VSYNC0 and setting REG_PCLK=0
- Setting the capacitive touch panel controller (CTP) to a low power mode. For Focaltech CTPs this can be done via the ‘low-power mode’ bit in REG_TOUCH_CONFIG. For other CTPs, EVE’s custom touch feature can be used to implement the sleep/wakeup according to the CTP protocol found in its datasheet.
- Disable the external audio amplifier by selecting its low power mode via a GPIO from EVE.
- Disable the carrier wave on the EVE audio output pin by playing the mute sound via the sound registers.
The In-Home display can be woken up when the user touches the screen or when the MCU receives important data to display. The EVE Interrupt pin allows the MCU to easily determine when the screen has been touched.
Note: Capacitive Touch Panel controllers often have several modes with different current consumptions (e.g. active, monitor and sleep). They may not detect touches in some low power modes, check the datasheet of your selected touch controller.
Although the display (and audio) can account for most of the current, EVE also has low power modes which reduce the consumption of the IC itself to a minimum. Several modes are available to allow the best combination of power saving vs start-up time/actions to be chosen for the application. These include the following modes (check the datasheet for your EVE device for specific details)
- Standby: The system core clocks are disabled but the crystal oscillator and PLL remain on and the register contents are retained.
- Sleep: The system core clocks, crystal oscillator and PLL are all disabled. The register contents are retained.
- Powerdown: The system core clocks, crystal oscillator and PLL are all disabled for even lower power. All register contents are lost and reset to default when the chip is next switched on.
The EVE Interrupt pin can be used to indicate touches to your MCU even when EVE is in low power modes, allowing the MCU to wake the display when the user interacts with the screen.
Touch screens normally report x and y coordinates corresponding to the position of the touch on the screen (via I2C for capacitive touch and via resistance values for resistive). Traditionally, the process of decoding touch coordinates reported by the panel, transforming them to match the screen dimensions and alignment, and then working out which (if any) item on the screen is within the area being touched can be complex and time-consuming for the main MCU controlling the display.
EVE is integrating an innovative touch engine which does all this hard work, making it much easier to add resistive or capacitive touch control to your application. One key feature, which helps to reduce the workload of both the MCU itself and of the application developer, is Touch Tagging. Instead of manually comparing the coordinates to those of items on the screen, you can simply assign tag values when creating your screen layout as a display/co-processor list. Items drawn on the screen are assigned a tag number based on the last specified tag before them in the display list. Then, the MCU can simply read EVE’s REG_TOUCH_TAG register (either by polling or in response to an Interrupt from EVE) to determine which item is being touched.
However, there may also be items on the screen that you do not want to tag. For example, a bitmap or shape behind a group of tagged buttons/icons or text labels beside the buttons. You can use the TAG_MASK instruction to stop items being tagged. We illustrate this here with a simple example.
The tag buffer (which has a value for each pixel) is cleared to a default or specified value when you clear the screen (in the example below we set Clear_Tag as 128).
- Tag_Mask = 1 enables tagging: When you draw an object, the tag buffer in the area of the object (button, text etc.) will be updated with the last tag set above in the display list
- Tag_Mask = 0 disables tagging: When you draw an object, the tag buffer is not updated with a new tag value
The simplified code example below shows the actual tag number which will be read back from REG_TOUCH_TAG when each object is touched
- No touch on the screen: REG_TOUCH_TAG = 0
- Touching the buttons or text: See the comments for each line of code
- Touching any other area of the screen: REG_TOUCH_TAG = 128 (as set by CLEAR_TAG)
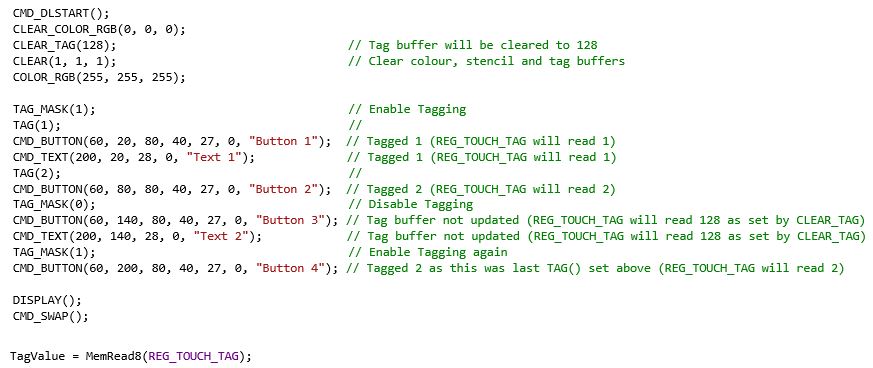

Note that the REG_TOUCH_TAG register is updated once the pixels for a given frame are fully scanned out. We use buttons and text here but the same applies to other objects such as shapes and images. The capacitive versions of EVE support up to 5 simultaneous touches and so have 5 different REG_TOUCH_TAG registers allowing the tag for each touch to be read.
No, EVE does most of the hard work to render your colour graphics and so a powerful MCU is not needed. This also allows your MCU to do other tasks such as processing the meter data or talking to remote metering equipment over a wireless link.
Some features of EVE which help minimise the MCU’s workload include:
- EVE’s efficient command-based screen creation allows complex graphics with minimal MCU workload and SPI traffic
- Using built-in widgets such as gauges, gradients and buttons further reduces this, allowing user controls to be created easily without complex graphical operations or calculations
- Your MCU only needs to send a new display list when the screen content changes (no need to refresh the screen constantly)
- Store sections of the display list in EVE’s RAM for parts of the screen content that do not often change and recall them using the APPEND command
- On BT817/818/817A, you can now also store sections of co-processor lists and recall with the CALLLIST command for even greater flexibility
Use EVE’s interrupts to tell your MCU when a touch event has occurred, and use touch tags to easily determine which item was touched
对于 SVGA(800×600)(仅限 FT81X),刷新率为 60Hz(典型配置)。
For WQVGA (480×272), the refresh rate is 60Hz (typical configuration). For QVGA (320X240), the refresh rate is 60Hz (typical configuration)
根据显示面板的要求,可通过调整 PCLK_DIV、HCYCLE 和 VCYCLE 寄存器配置其他刷新率值。
EVE 支持市场上的 SVGA(800×600,仅限 FT81X)、WQVGA(480×272)和 QVGA(320×240)等液晶显示器。还支持数据启用和 VSYNC/HSYNC 模式,为市场上的各种显示器提供灵活性。
FT80X 支持视频 RGB、并行输出(默认 RGB 数据宽度为 6-6-6)和 2 位抖动;可配置为支持高达 512×512 的分辨率和 1 至 6 的 LCD R/G/B 数据宽度。
FT810/FT811 支持视频 RGB、并行输出;可配置为支持高达 800×600 的分辨率和 1 至 6 的 LCD R/G/B 数据宽度。
FT812/FT813 支持视频 RGB、并行输出;可配置为支持高达 800×600 的分辨率和 1 至 8 的 LCD R/G/B 数据宽度。
所需的信号包括 R [7:2] 或 [7:0]、G [7:2] 或 [7:0]、B [7:2] 或 [7:0]、PCLK、DE、VSYNC 和 HSYNC。R、G、B 信号的位置可由用户配置。此外,R、G、B 信号的端位也可配置。这将大大简化 PCB 的布线工作。
是的,EVE 有一个 PWM 输出,用于驱动背光 LED 驱动器。它支持背光的全开、全关和调光。
对使用哪种背光驱动器没有具体要求。通常取决于 LCD/LED 的规格。FT8XX 设计中的背光驱动器是 MIC2289-34。
渐变实际上是由控制EVE的MCU控制的。淡入淡出效果与图标(位图)的 alpha 值有关
static void showhome()
{
if (!screen.snapshot && homefade) {
VC.command(COLOR_A(min(255, homefade * 3)));
static PROGMEM prog_uint32_t std1[] = {
TAG(TAG_HOME),
LINE_WIDTH(48),
BEGIN(RECTS),
COLOR_RGB(0,0,0),
VERTEX2II(4, 4, 0, 0),
VERTEX2II(6+32, 6+32, 0, 0),
COLOR_RGB(255,255,255),
VERTEX2II(5, 5, 0, 0),
VERTEX2II(5+32, 5+32, 0, 0),
BEGIN(BITMAPS),
COLOR_RGB(0,0,0),
VERTEX2II(5, 5, 14, 0),
};
MEMCMD(std1);
}
endframe();
}
“homefade”的值受屏幕上的触摸活动的影响。
是,将每个字符分开显示。这样就可以为数字或字母应用独特的字体。
不, 校准应至少进行一次(制造/首次使用),之后可将校准值存储到内部非易失性存储器中,以便在随后的开机过程中使用,如下例所示。
// 如果 EEPROM 以字节 0x7c 开始,那么它已经保存了
// 24 字节触摸屏校准值。
如果 (istouch() || (EEPROM.read(0) != 0x7c)) {
blank();
while (istouch())
;
VC.wr(REG_PWM_DUTY, 128);
MEMCMD(start_clear);
VC.cmd_text(screen.w/2, screen.h/2, 28, OPT_CENTERX|OPT_CENTERY, “please tap on the dot”);
BLK_START
CMD_CALIBRATE,
0
BLK_END
VC.waitidle();
for (int i = 0; i < 24; i++)
EEPROM.write(1 + i, VC.rd(REG_TOUCH_TRANSFORM_A + i));
EEPROM.write(0, 0x7c); // is written!
}
else {
for (int i = 0; i < 24; i++)
VC.wr(REG_TOUCH_TRANSFORM_A + i, EEPROM.read(1 + i));
}
矩形是通过基元命令 RECTS 绘制的。要调整边角的外观,可在绘制矩形之前调用 LINE_WIDTH 命令来调整边角半径。
A logo is simply a picture (bitmap). As such it should be treated no differently than any other bitmap.
Create your image and size it using PC tools such as paint or GIMP. Use the image conversion utility to convert to a format that is suitable (higher resolution = more memory) and load the image. See the examples page for code examples e.g. Example 6 – Image Viewer.
EVE 常见问题 - 触摸
FT800/FT810/FT812 支持四线电阻式触摸屏控制器,该控制器集成了中值滤波和触摸力感应功能。
FT801/FT811/FT813 supports I²C capacitive touch screen with up to 5 touch detection.
有关 4 线电阻式触摸屏工作原理的详细说明,请参阅此链接。 http://www.sparkfun.com/datasheets/LCD/HOW%20DOES%20IT%20WORK.pdf
有关电容式触摸屏工作原理的详细说明,请参阅此链接。
https://www.youtube.com/watch?v=BR4wNq6WGkg
是,可在 FT800/FT810/FT802 上检测触摸压力测量。
FT800/FT810/FT812 是电阻式触摸解决方案,不支持多点触摸。
FT801/FT811/FT813 are capacitive touch solution which support 5 touch detection.
是的,用户可以用触控笔或手指拖动屏幕滑块。
请参阅应用程序说明 AN_336 FT8xx-选择液晶显示屏 有关兼容触摸控制器的列表,请参见第 6 节。
EVE 常见问题 - 音频
EVE 通过 Audio_L 引脚输出音频信号。该信号进入外部放大器电路,然后连接到扬声器。许多 EVE 的开发模块都在 PCB 上包含放大器和板载扬声器或外部扬声器连接器。以下是一些需要检查的事项:
- 检查所有连接,并检查外置扬声器(如果使用)的阻抗是否适合所使用的放大器
- 检查电路板上的跳线是否设置为给放大器供电
- 检查所用电源是否有足够的电流能力(由于显示屏背光和音频电路的原因,整个显示屏模块可能需要相当大的电流,通常为几百毫安或更多。)
- 确保音频放大器未处于掉电状态。许多评估模块都有一个由 EVE 上 GPIO 线控制的掉电信号,用于在不使用时关闭放大器。检查 EVE 中的 GPIO 和 GPIO 方向寄存器是否将该 GPIO 线路设置为输出,并将其设置为正确的状态以启用放大器。
- Ensure the volume has not been turned down. Volume is controlled by REG_VOL_SOUND for sounds and REG_VOL_PB for playback of audio. A value of 0xFF is the highest while a value of 0x00 is muted.
EVE 支持单声道 8 位线性 PCM、4 位 ADPCM 和 μ-Law 编码格式的音频波播放,采样频率为 8kHz 至 48kHz。
音频输出为 PWM 信号,经过三级滤波后产生最终的模拟音频信号。信噪比为 46db。
EVE 输出的音频为单声道。
48KHz,如果信号源不是 48Khz,则向上采样。
是的,EVE 有 8 位分辨率的音量控制。
MCU 常见问题 - 概述
是的,IDM2040-43A 将 Raspberry Pi RP2040 作为其主机 MCU,其中包括一个引脚输出 UART 接口。该接口可与我们的 IDM-RS232 和 IDM-RS485 子板结合使用,为 IDM2040-43A 提供 RS232 和 RS485 连接。
BT880 通过可定制的显示设置寄存器支持各种尺寸的 LCD 屏幕,常用的 LCD 尺寸包括 QVGA(320*240)、WQVGA(480*272)和 HVGA(480*320): 每行支持的最大像素数为 2048,因此 BT880 可以使用 800×160 或 1024×120 分辨率的条形显示屏。如果您对 BT880 的 LCD 支持有任何疑问,请联系 support.emea@brtchip.com
即使没有声音播放,音频输出引脚通常也会输出载波。要停止这种情况,可以通过向 REG_SOUND 寄存器写入 0x60 来播放 MUTE 声音。
是的,VM880C 是您开发新的纵向或横向应用程序原型的理想之选。VM880C 使用寶吉特新推出的 BT880 显示/触摸/音频控制器。
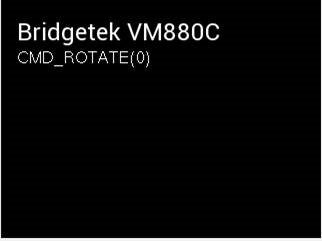
BT880 具有屏幕旋转功能。通过调用 CMD_SETROTATE,可以设置七种不同的屏幕方向。因此,你可以在纵向使用横向面板,而不需要任何复杂的软件旋转。
CMD_SETROTATE will rotate both the screen content and the resistive touch so you can have the full touchscreen functionality in each different orientation. The screen can also be rotated by writing the same value directly to REG_ROTATE but this does not rotate touch, and so using CMD_SETROTATE is recommended.
CMD_SETROTATE 提供以下选项:
0 表示默认横向
1 代表倒置景观
2 代表人像
3 代表倒立人像
4 代表镜面景观
5 代表镜人像倒置景观
6 代表镜像人像
7 代表镜像倒立人像
BT880 和 BT881 是 EVE 系列设备中的新系列,非常适合使用最大 4.3 英寸和 5 英寸显示屏的应用。它们具有 FT81x 系列的许多功能,如纵向屏幕旋转,为使用 480×272、320×480 和 320×240 等分辨率屏幕的应用提供了经济高效的解决方案。BT880 和 BT881 提供 6+6+6 18 位 RGB 接口,具有电阻式(BT880)和电容式(BT881)触摸功能。
MM900EV 模块为评估 FT90x 系列微控制器提供了一种简便的方法。建议将 UMFTPD2A 模块与MM900EV模块一起使用,以便您可以从FT900工具链进行调试和闪存编程。我们还提供了大量与工具链一起安装的示例。其中许多示例通过 FT900 的 UART 提供调试打印输出,还有一些示例(如 UART 示例)通过 UART 发送和接收数据。通过 UART 接收和发送数据的一种简便方法是使用 UMFTPD2A 上的备用 UART 端口。它使用板载 FTDI FT4232H USB 串行接口的通道 3。
您可以将 MM900EV1B 的 UART 线路连接到 UMFTPD2A J2 连接器上的线路。
以 MM900EV1B 为例,使用 FT900 上的 UART0,连接方式为
UMFTPD2A J2 pin 1 (GND) 至 MM900EV1B CN3 pin 2 (GND)
UMFTPD2A J2 pin 2 (CTS#) 至 MM900EV1B CN3 pin 8 (RTS#)
UMFTPD2A J2 pin 3 (不连接)
UMFTPD2A J2 pin 4 (TxD) 至 MM900EV1B CN3 pin 6 (RxD)
UMFTPD2A J2 pin 5 (RxD) 至 MM900EV1B CN3 pin 4 (TxD)
UMFTPD2A J2 pin 6 (RTS#) 至 MM900EV1B CN3 pin 10 (CTS#)
UMFTPD2A 连接到 PC 并准备就绪后(显示在 "设备管理器 "中的 "通用串行总线控制器 "和 "端口 "部分),就可以通过 PuTTY 等标准终端程序打开端口 C。模块通常显示为四个连续的 COM 端口,如 USB 串行端口 (COM4) 至 (COM7)。备用 UART 端口 C 通常是第三个,因此本例中为 COM6。将波特率设置为与 FT900 示例代码中使用的波特率一致,然后打开端口,现在就可以轻松地与 UART 通信,而不需要单独的串行设备。
.
不,这对 VNC2 没有影响。我们认为所有系列都具有极高的价值,其共同点是都具备关键的 USB 功能。
- VNC2 提供 2 x USB2.0 高速端口,可配置为主机或设备
- FT51A 提供 USB 设备和集线器功能
- FT900 提供 1 个 USB2.0 高速主机和 1 个 USB2.0 高速设备。
毋庸置疑,FT51A 和 FT900 的目标是实现高性能,并具备对整个系统价值至关重要的功能。
与 VNC2 不同,FT900 和 FT51A 提供完整的库 API 源代码,为开发人员提供了更大的灵活性。
FT51A 从根本上说是一个 8051,寄存器图也反映了这一点。对于已经熟悉 8051 设计的客户来说,学习难度不大。
FT900 全部为寶吉特专有,但寄存器映射以及示例代码和驱动程序均可提供。FT32 内核技术手册在保密协议下提供。
我们选择 Eclipse 作为业界知名的开放源码集成开发环境,我们可以通过插件扩展调试器/固件上传功能。因此,所有人都可以免费使用。
Expanding an existing tool enables a faster time to market, whilst also presenting a familiar interface for existing Eclipse users again making the learning curve for these new devices shorter and shallower.
如果您正在寻找更成熟的环境,请参阅 MikroElektronika 提供的工具。他们将为 FT51A 和 FT900 设备提供硬件和集成开发环境(IDE)。
FT900 使用的 GCC 不支持 FT51A 设备。因此需要使用不同的编译工具(FT51A 使用 SDCC)。不过,这两种工具都可以在 Eclipse IDE 中使用。
您只需支付集成电路本身和所需开发模块的费用。集成开发环境、应用程序接口库、示例代码和技术支持都是完全免费的,因此可以快速开发应用!
是的,提供了完整的源代码,以允许用户完全控制并允许修改,例如。用户只需将源文件包含在他们的项目中,即可覆盖预构建的库。
MCU 常见问题 - FT51A
44 引脚 LQFP 和 48 引脚 WQFN = 完整规格(1 x USB 上游、1 x USB 下游、16 个数字引脚、16 个模拟引脚)
28 引脚 SSOP 和 32 引脚 WQFN = 简化规格(1 x USB 上游,减少数字和模拟引脚)
注:固件可通过 IOMUX 编程更改引脚映射。
Firstly, the 8051 core we have selected is one of the fastest currently available.
Secondly, with the package options we offer from 28 pin SSOP to 48 pin QFN, we offer excellent choices for board area and cost.
第三是 USB 集线器功能,这在其他地方是找不到的。它允许级联 FT51A 设备,创建传感器和控制板网络,或将其他 USB 外围设备连接到 8051 内核。
- USB 数据采集
- 通用微控制器
- 传感器控制
- 用于医疗、工业和测试仪器的大容量数据存储器
- USB 至 RS232/RS422/RS485 转换器
- POS 系统
- 健身器材
- 智能家居控制
- 气象站
- 带 USB 鼠标端口的键盘
- USB 条形码阅读器
FT51A 可以提供 USB DFU 接口,这意味着如果将 USB 设备控制器连接到 PC,就可以使用一些简单的软件通过 USB 更新固件,这意味着不需要额外的编程硬件。
Bridgetek 出货的 "空白 "芯片包含已编程的 DFU 代码。不过,我们提供了示例源代码,用户可以将 DFU 接口添加到自己的应用代码中。
这是用户定义的,因为它取决于固件。我们在 FT51A示例中提供了大量示例,这些示例也随工具链一起提供。
正常运行时的工作电源电流(48MHz): 典型值 20mA(最大值 28mA)。
USB 暂停(内部时钟停止)时的工作电源电流: 典型值为 150uA。
FT51A 不需要操作系统。
是的,我们提供了几个连接 FT51A 和 EVE 的示例。源代码与 FT51A 工具链一起提供:
- FT51A 传感器示例
- FT51A Spaced Invaders 示例。
MCU 常见问题 - FT90x
We saw performance as a feature that could differentiate Bridgetek Chip from others in the market, especially in applications such as multimedia. The FT900 is a true 0 wait state solution even at maximum core clock speed (100MHz) offering performance of 3.1DMIPs/MHz. As a result, designers can have a blazing fast chip coupled with excellent connectivity options such as Ethernet, USB, CAN bus, as well as a camera interface.
| 封装: QFN/LQFP | CAN | 以太网 | 照相机 | SD | I2S | 其他* | |
| FT900Q/FT900L | 100/100 | Y | Y | Y | Y | Y | Y |
| FT901Q/FT901L | 100/100 | – | Y | Y | Y | Y | Y |
| FT902Q/FT902L | 100/100 | Y | – | Y | Y | Y | Y |
| FT903Q/FT903L | 100/100 | – | – | Y | Y | Y | Y |
| FT905Q/FT905L | 76/80 | Y | Y | – | – | – | Y |
| FT906Q/FT906L | 76/80 | – | Y | – | – | – | Y |
| FT907Q/FT907L | 76/80 | Y | – | – | – | – | Y |
| FT908Q/FT908L | 76/80 | – | – | – | – | – | Y |
无 CAN - 降低成本(无许可证)
无以太网 - 降低功耗(有专用调节器)
无摄像头/SD/I2S - 减少引脚数
*USB 主机、USB 外设、SPI、UART、ADC、DAC、I2C、PWM、RTC、定时器/看门狗、中断控制器
- 家庭自动化系统
- 家庭安全系统
- 在嵌入式产品中启用高速 USB 主机或设备功能
- 机顶盒应用(如 USB 调谐器)
- 工业控制和医疗系统应用
- 嵌入式音频应用
- 网络摄像机
- VIOP 电话
- 数据采集系统
- 工业控制界面
- MP3 播放器
I2S(Inter-IC Sound)是一种 串行总线 接口标准,用于传输数字音频。
掉电电流 - 700uA(约)
空闲电流 - 42mA(约)
正常工作电流 - 100mA(视使用的外设而定)
32 位 MCU / ARM - 通常为 TI、ATMEL、ST 产品。
是的,加速度计和其他芯片一样,只是一个外设芯片。
可使用开源实时操作系统 FreeRTOS。
Bridgetek has ported lwIP to the FT90x.
lwIP (轻量级 IP)是一种广泛使用的开源 TCP/IP 协议栈,专为嵌入式系统设计。
这在FT90x示例页面中的一些以太网桥接应用示例中可用。
Yes, Bridgetek has produced an example FT90x UART to FTDI’s FT232 Host Bridge application.
该示例演示了将 FT90x USB 主机端口上的 FTxxx 类设备(如 FT232R、FT-X 系列)桥接到 UART 接口,并可双向传输数据。
请注意: 由于用于控制 FTxxxx 设备的 USB 命令会被暴露,因此该库以预编译的形式提供。
Bridgetek has produced examples showcasing how to use EVE with various host controllers including the FT90x.
Please navigate to the Support –> Software Examples –> EVE Projects on our website for more information.
The FT9xx can be accessed through DFU in three main cases:
- If the Flash has no application firmware programmed: FT9xx devices are supplied with the DFU code already included. Because the Flash has no application firmware, the device will enter DFU mode on start-up and will appear as a DFU device when connected to a computer. This is one approach for initial application firmware programming to be carried out in a production environment.
- When programmed with the main application in the field: Once the FT9xx is programmed with application firmware and is out in the field, DFU offers an easy way to do updates. A DFU code module can be included in the application firmware to support this. The DFU can be activated in several ways including:
-
- On each start-up: The FT9xx will appear as a DFU device for a period specified in the DFU code module (e.g. 5 seconds). During this time, the firmware update application on the computer can capture the DFU and begin communication with the bootloader.
- Always active: The DFU is always active and will appear as a DFU endpoint which can be opened at any time by the firmware update application on the computer
- Application code (via GPIO etc.) activation: The application code can activate the DFU. For example, this could be via the state of a GPIO connected to a pushbutton allowing the user to manually activate DFU
- If the Flash checksum fails: On power-up, the FT9xx verifies the flash against the checksum. In the event of failed programming, flash corruption or if an application error results in flash being written without updating the checksum, the checksum will fail and DFU will be activated, allowing the flash to be reprogrammed.
In order to provide DFU updates in the application, the following requirements must be considered:
- Device Side: The application firmware developed in the Eclipse IDE must include the DFU code module. The Bridgetek FT9xx Programming Utility (part of the FT9xx 工具链) can be used to prepare a DFU compatible version of the resulting binary file by adding the required DFU Suffix. This binary can then be sent to the FT9xx over DFU by the firmware update application (refer to the Computer Side bullet point below). If the main application uses the FT9xx as a USB device already, the DFU will appear as an additional USB endpoint. If the application does not normally act as a USB device, the USB connector can be provided in the harwdare design to allow for it to be used for device firmware updates.
- Computer Side: A suitable application must be provided to the user which will perform the firmware update over DFU. Bridgetek provides the FT9xx Programming Utility (part of the FT9xx 工具链) which includes a range of programming tools via a graphical user interface but this is not intended for consumers and end-users. Developers can create a user-friendly end-user application or integrate this functionality into their main application software. The functions in Bridgetek’s command line FT9xxProg.exe utility (which is also included with the toolchain) provide a simple way of opening and programming the device over DFU and can be called from the application. The firmware file can be provided to users to download or can be included in an application package, allowing users to perform the update later with no internet connection.
请注意: The DFU supports programming but not debugging of the FT9xx. DFU is not recommended as the exclusive interface for the application development phase as DFU can be overwritten, should a version of the application code which does not include the DFU be accidentally programmed.
The Bridgetek UMFTPD2A Programming/Debug module is recommended for development as it supports debugging and provides access even when the DFU is not included in the application firmware. Providing a connector for the UMFTPD2A (or a PCB footprint) on production boards also allows access in future.
请注意: Users should take care if preparing their own DFU firmware image manually. Bridgetek provide the FT9xx Programming Utility which helps users create their firmware image for use with DFU. This tool checks the prefix and that the firmware file is of the correct size for the FT90x or FT93x. It is also possible to prepare a flash image manually using the associated dfu-util and dfu-prefix tools. If doing so, the user must ensure that their firmware is not larger than 252KB for FT90x and 124KB for FT93x to avoid the bootloader at the end of the flash being corrupted. Also, the FT90x/FT93x will enter DFU mode continuously if the application checksum is not calculated correctly or if the FTDI ID byte (0x03 0x04 crc-0 crc-1) is not present at the end of the application partition.
For more information on the DFU and Bootloader, see https://brtchip.com/wp-content/uploads/2024/07/BRT_AN_063_FT9xx_Programming-Debugging-and-Troubleshooting.pdf
FT90x 设备可将 FTDI D2XX 设备模拟到主机 PC 上,数据通过 D2XX 通道在终端 PC 应用程序(例如)和用户固件应用程序之间来回发送。
默认 USB 设置(如 VID、PID、制造商和序列号)可通过 FT900 编程 GUI 实用程序的 D2XX 选项卡进行更改。请参见 AN 365 FT9xx API程序员手册 和 AN 360 FT900应用实例 了解更多信息。
是的。我们提供了通过 Android Open Accessory (AOA) 连接 Android 的示例。这意味着 FT90x USB 主机会枚举安卓设备。请参见 AN 365 FT9xx API程序员手册 和 AN 360 FT900应用实例 了解更多信息。
Bridgetek has been working closely with 3rd party partners in order to offer additional design aids. A collaboration with MCCI® Corporation, a leading developer of USB drivers and firmware for embedded SoC has resulted in the availability of TrueTaskВ® USB, an embedded USB host stack designed for use with the FT90x MCU product family, and a partnership with MikroE has culminated in providing a comprehensive development environment for the FT90x including compilers, development boards, useful examples for click boards and Visual TFT software support. For more information on MCCI and MikroE, please visit www.mcci.com 和 www.mikroe.com.
MCU 常见问题 - FT93x
Recently announced at Electronica 2016 is the expansion of the series to include the FT93x, a range of advanced USB to Multi-interface bridging microcontrollers. These are due to launch for sale in full production quantities from Q1 2017, however in advance of this please click here for the datasheet.


