I’m designing a blood pressure monitor with a BT88X-series and I want to make a linear gauge with a customised colour gradient scale. How can I do it with EVE?
Creating a bitmap may seem like the only solution but EVE’s gradient command can help instead. You can save MCU Flash memory space, BT88X-series RAM graphics memory space and indeed the time needed to create and convert a bitmap by using EVE’s built-in gradient widget.
The EVE gradient command renders a smooth gradient from one specified colour to another. However, for some applications we may want to have more control over the colour in certain parts of the gauge and so here we use two gradients. The first gradient for the upper half of the gauge goes from red to amber.
By default, the gradient itself fills the entire width of the screen between the start and end coordinates, and also extends below and above the specified coordinates, as shown in Figure 1a. We can use the Scissor feature to limit the gradient to a specified area: we set the top-left corner at (20,20) with Scissor_XY and then set the size in pixels (20 x 120) with Scissor_Size. Drawing the gradient now fills only the desired area as shown in Figure 1b. The full list of commands used to create the gauge are also shown below Figure 1.
We can then draw the lower half of the gauge using the same technique. This time, we use the same amber colour at the top of the gradient, and fade to green at the bottom as shown in Figure 1c.
We finish by setting the Scissor_XY back to 0,0 and the Scissor_Size back to the full screen so that any objects drawn after the gauge are not cropped. A save context and restore context can be used instead as shown commented out.
Various methods can be used to add a pointer. In this case a simple white line is used. The Y value of the vertex instructions can be adjusted to make the pointer move up and down along the gradient. Figure 1d shows the final gauge.
EVE Screen Designer has a range of built-in custom gauges that you can add to projects.
You can draw other types of gauges too using this technique such as the arc gauge shown in Figure 1e. Stay tuned, we’ll show you how to do this in a future FAQ. You can, however, contact us at support.emea@brtchip.com for any further information on drawing gauges with EVE…”

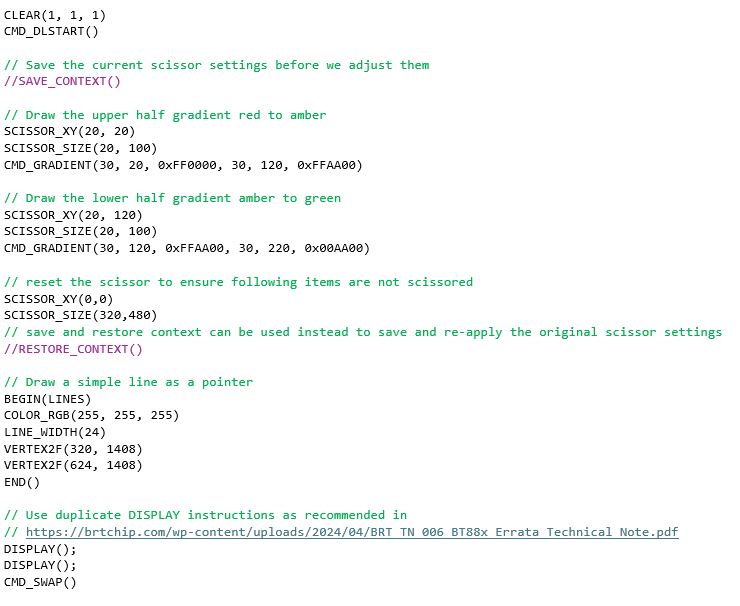
Here is the full list of commands used to draw the gauge.
Why not try it out now using our EVE Screen Editor (ESE) tool?
Just download and install ESE using the link above, set the Device Type to BT880, BT881, BT882 or BT883 in the Project window, and paste the code below into the Coprocessor window at the bottom of ESE.